


[ad_1]
Recently, we wrote a tutorial on how to edit the Hosts file in Windows 11 if you wish to block specific websites on your PC. However, if you want to improve your privacy on Windows 11, changing the DNS settings is also a must. It will secure the internet communication on your computer, be it opening a website or an app trying to connect to its server in the background. If you are new to this domain, learn how to change DNS settings in Windows 11 in this detailed guide.
Change DNS Settings in Windows 11 (2022)
In this guide, we have included five methods to change the DNS settings in Windows 11. Along with that, we have explained what is DNS and why you should change DNS settings on your PC. Expand the table below to read the explainer or directly skip to the desired method.
What is DNS in Windows 11?
DNS or Domain Name System is like a phonebook of the internet. When you open a website, your computer connects to a DNS server to find the IP address of the website. That’s how it locates the address and connects you to the website. The DNS server is needed so that you don’t have to remember the complex IP addresses of websites.


There are many DNS servers out there, from ISP ones to servers offered by Google, Cloudflare, OpenDNS, etc. Each DNS server claims that it can retrieve information faster than the other. Some offer built-in security like DNS-over-TLS, and some offer lower latency. It depends on which one you would like to use on your Windows 11 PC.
That said, the reason I suggest users to change the default DNS server in Windows 11 is because ISPs are increasingly logging the DNS query, which is not good for your privacy. This means your Internet provider can know which website you visited through the DNS log. So to be on the safer side, use custom DNS servers that are well known, that do not log your queries, offer reliable performance, and security against phishing and malware attacks.
Now, having made that clear, let’s go ahead and learn about some popular DNS servers for Windows 11.
Free DNS Servers for Windows 11
Here are some free and popular DNS servers that you can use on your Windows 11 PC. We have added both preferred (also called primary) and alternative (also called secondary) DNS addresses of popular services.
1. Cloudflare
Preferred DNS: 1.1.1.1
Alternative DNS: 1.0.0.1
2. Google
Preferred DNS: 8.8.8.8
Alternative DNS: 8.8.4.4
3. OpenDNS
Preferred DNS: 208.67.222.222
Alternative DNS: 208.67.220.220
4. Comodo Secure DNS
Preferred DNS: 8.26.56.26
Alternative DNS: 8.20.247.20
5. Quad9 DNS
Preferred DNS: 9.9.9.9
Alternative DNS: 149.112.112.112
Change DNS Server Using Settings App in Windows 11
The easiest method to change the DNS server in Windows 11 is from the Settings. It lets you define the DNS with IPv4 and IPv6 protocols. Here is how to go about this process:
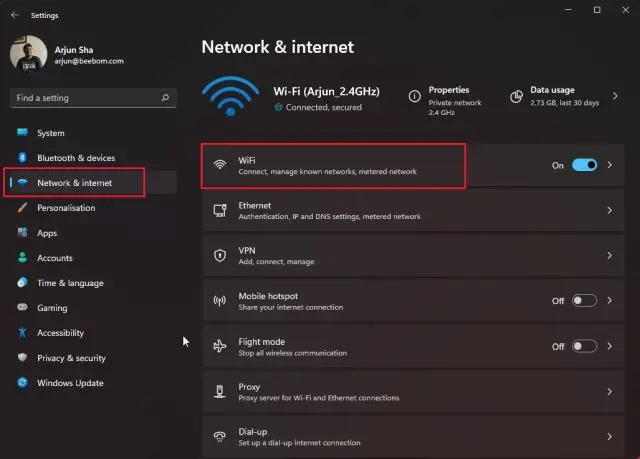
1. Press the Windows 11 keyboard shortcut “Windows +I” to open the Settings app. Here, move to the “Network and Internet” settings menu from the left sidebar and click on “Wi-Fi” in the right pane. If you have a wired Ethernet connection, click on “Ethernet”.

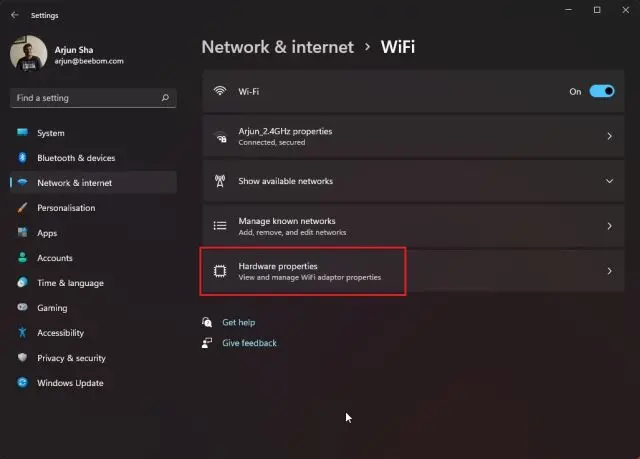
2. Next, scroll down and look for “Hardware properties“. Open it.
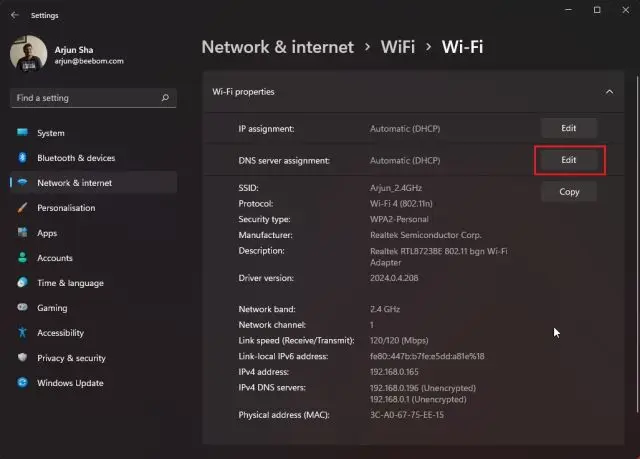
3. Now, click on “Edit” next to “DNS server assignment”. It will be set to “Automatic (DHCP)”, which means Windows 11 is using the DNS server chosen by your ISP. This is what we need to change.
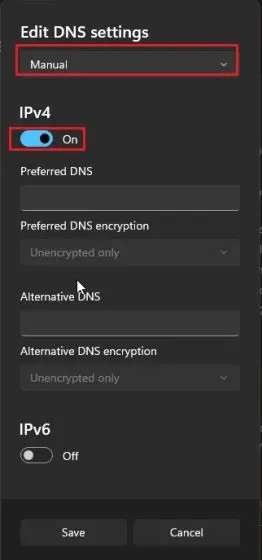
4. On the next page, select “Manual” from the drop-down menu and enable the “IPv4” toggle.

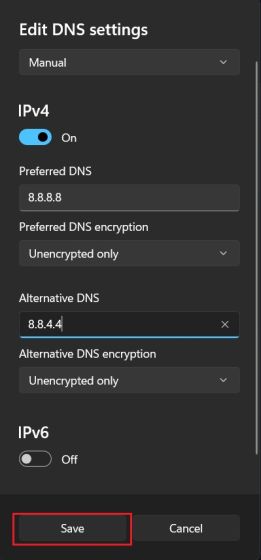
5. After that, in the “Preferred” and “Alternative” DNS fields, enter the custom DNS server address you want to use. You can find the best DNS servers from our linked article. I generally go with Google’s DNS server, which is as follows:
- Preferred DNS:
8.8.8.8 - Alternative DNS:
8.8.4.4


6. Once you are done, click “Save“, and you have successfully changed the DNS server in Windows 11. In case you also wish to learn how to enable DNS-over-HTTPS on Windows 11, which will make all DNS queries encrypted, move to the next step.

7. Click on the drop-down menu below “Preferred” and “Alternative” DNS encryption and change the encryption type to “Encrypted only (DNS over HTTPS)”.

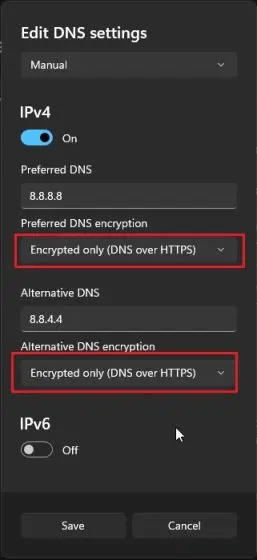
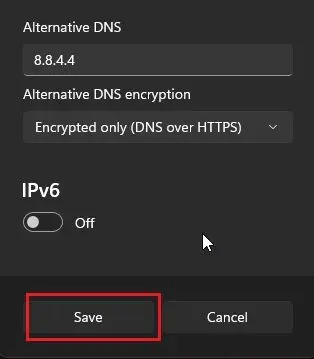
8. Now, click on “Save“, and you are done. Along with a custom DNS server in Windows 11, you have also enabled encryption for all your DNS queries, which will make network communication on your PC more secure.

Change DNS Server from Control Panel in Windows 11
In case you are old-school like me and want to change the DNS server in Windows 11 from the Control Panel, follow our guide below.
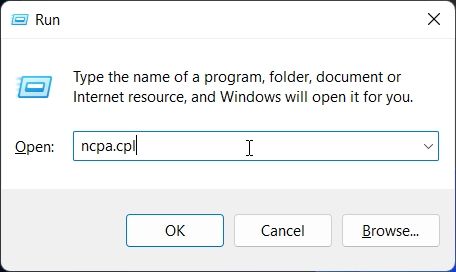
1. Use the “Windows + R” shortcut to open the Run prompt window. Here, type ncpa.cpl and hit Enter.

2. This will open the Network and Internet window in the Control Panel directly. You can also manually open Control Panel in Windows 11 and move to “Network and Sharing Center”.

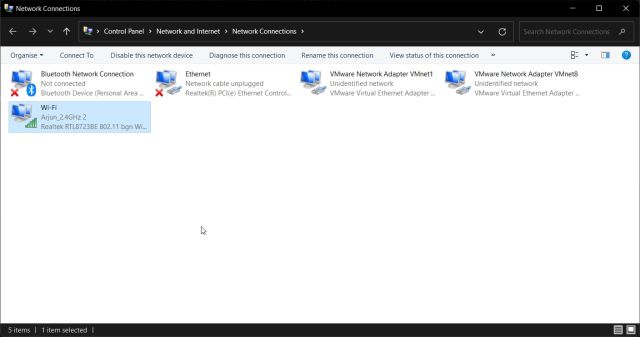
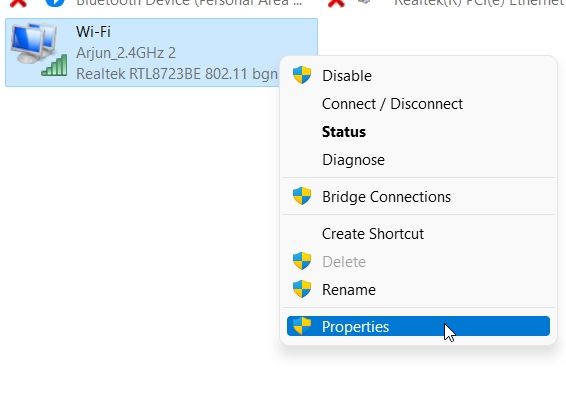
3. Once you are here, right-click on your “Wi-Fi” adapter and select “Properties“. If you are using a wired Ethernet connection, right-click on “Ethernet” and select “Properties”.

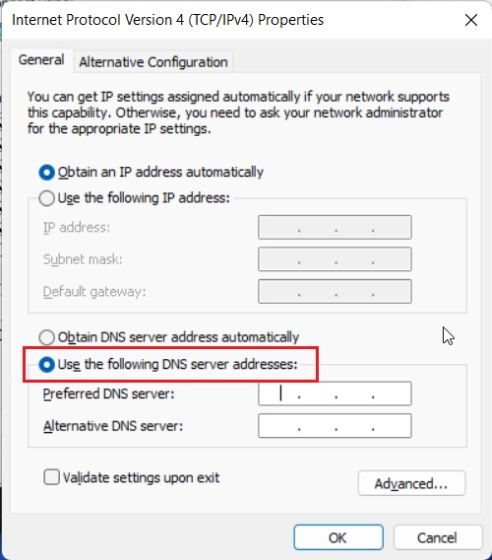
4. Next, scroll down and double-click on “Internet Protocol Version 4 (TCP/IPv4)“.

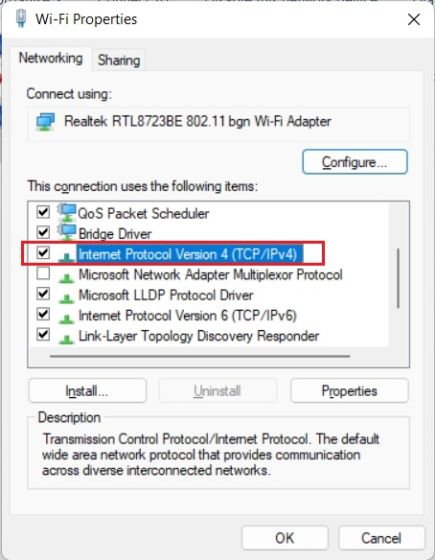
5. Now, this will open a new pop-up window, where you need to select “Use the following DNS server addresses”. This is where we are going to set up our custom DNS server.

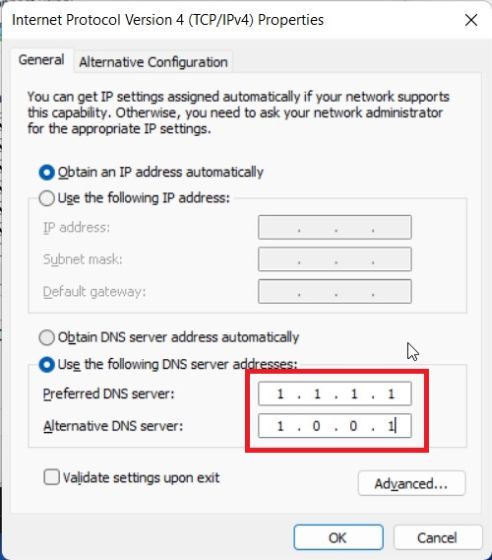
6. Now, enter the Preferred and Alternative DNS servers in their respective fields. For example, here I am using Cloudflare’s DNS servers, which are mentioned below. You are free to choose your own.
- Preferred DNS:
1.1.1.1 - Alternative DNS:
1.0.0.1
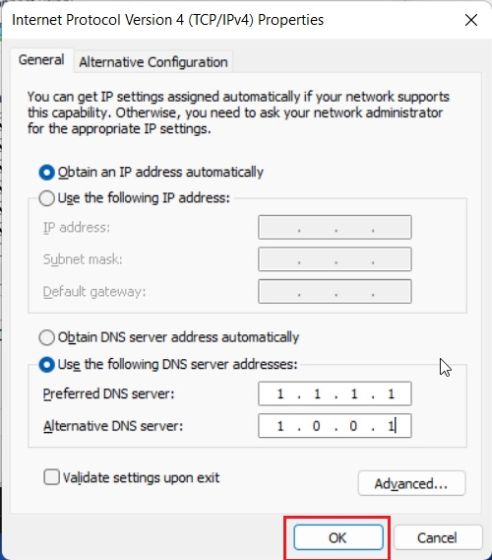
7. Finally, click on “OK“, and that’s it. You have set up a custom DNS server on your Windows 11 PC.
Change DNS Settings Using Command Prompt (CMD)
Apart from Windows Settings and Control Panel, you can also change the DNS settings using Command Prompt. You just need to use a few commands, and you are set. Here are the steps you need to follow:
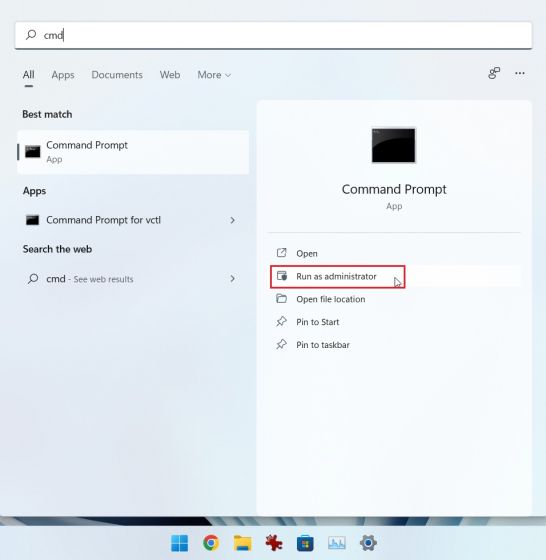
1. Press the Windows key and type “cmd” in the search bar. Now, click on “Run as Administrator” in the right pane. If you always want to run apps with admin privilege in Windows 11, go through our linked guide.

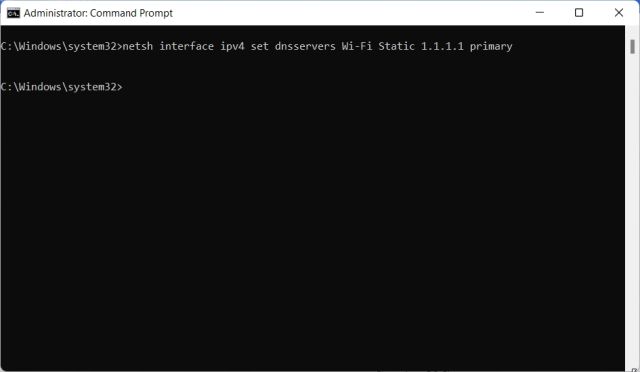
2. Next, run the below command in the CMD window. Make sure to replace preferred with the primary DNS of your server. For instance – I have used 1.1.1.1, which is Cloudflare’s preferred DNS server. Also, if you’re using Ethernet, replace Wi-Fi with Ethernet in the below command.
netsh interface ipv4 set dnsservers Wi-Fi Static preferred primary

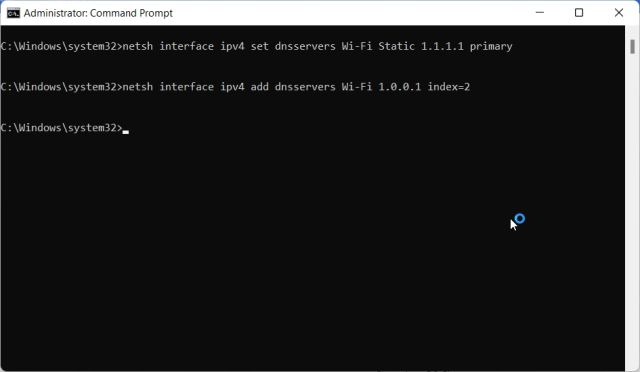
3. To set an alternative DNS server using Command Prompt, run the below command. Here, replace Alternative with the secondary DNS server. I have set Cloudflare’s 1.0.0.1 as the alternative DNS.
netsh interface ipv4 add dnsservers Wi-Fi Alternative index=2
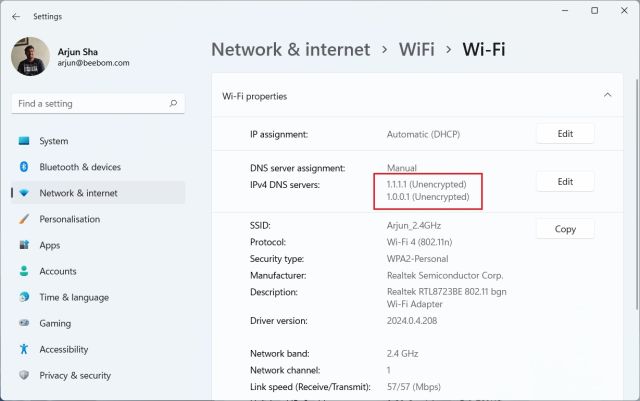
4. And you are done. Open the Settings app, and you will find that the custom DNS servers have been updated.

6. In case you want to reset the DNS settings to Automatic (DHCP), execute the below command in CMD on your Windows 11 PC.
netsh interface ip set dns "Local Area Connection" dhcp

Change DNS Settings Using PowerShell in Windows 11
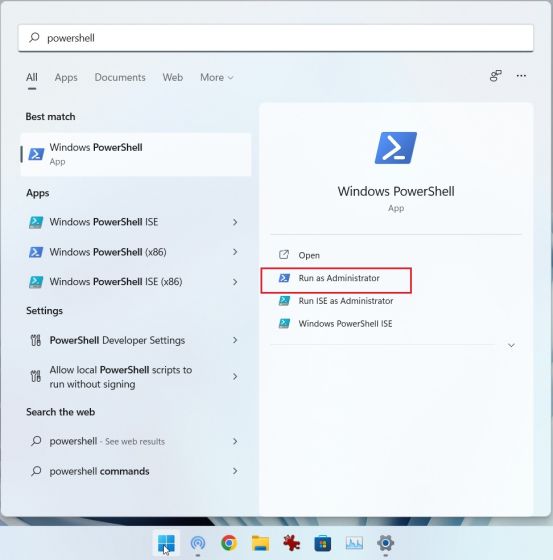
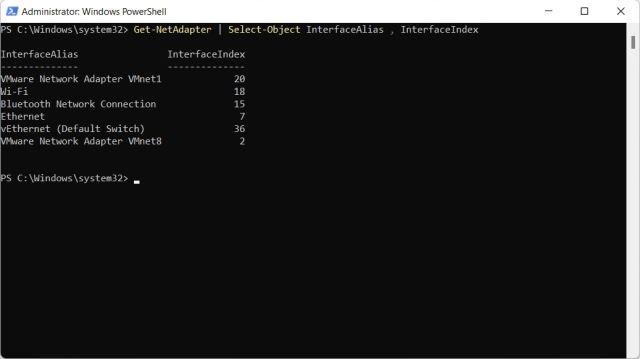
1. Press the Windows key and type “powershell“. Now, click on “Run as Administrator“.

2. Next, run the below command in PowerShell to note down the InterfaceIndex of your Wi-Fi adapter or Ethernet. For example – I am connected to a wireless network, and my InterfaceIndex is 18.
Get-NetAdapter | Select-Object InterfaceAlias , InterfaceIndex

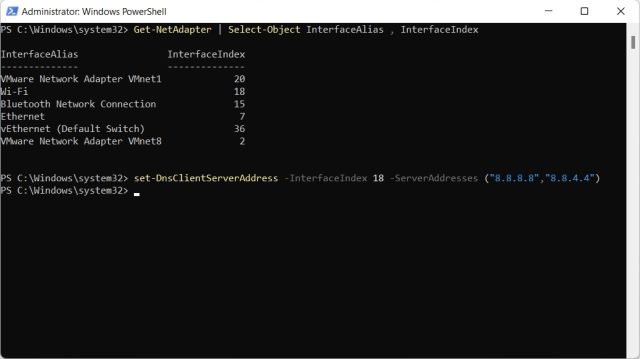
3. Now, run the below command. Make sure to replace N with the InterfaceIndex value (Wi-Fi or Ethernet) displayed on your PC. After that, replace preferred and alternative with the DNS servers of your choice.
set-DnsClientServerAddress -InterfaceIndex N -ServerAddresses ("preferred","alternative")
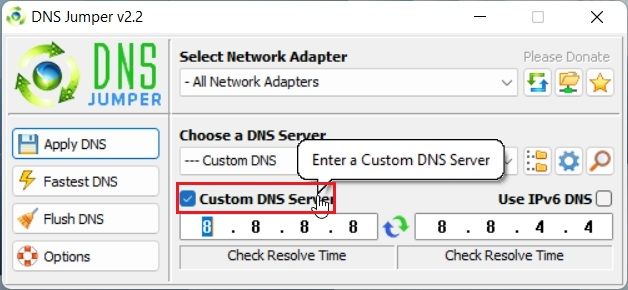
Change DNS Server in Windows 11 With DNS Jumper
If you are looking for a third-party app to change DNS settings in Windows 11, then DNS Jumper is one of the best programs out there. It’s free and offers a long list of DNS servers that you can apply with the click of a button. Here is how it works:
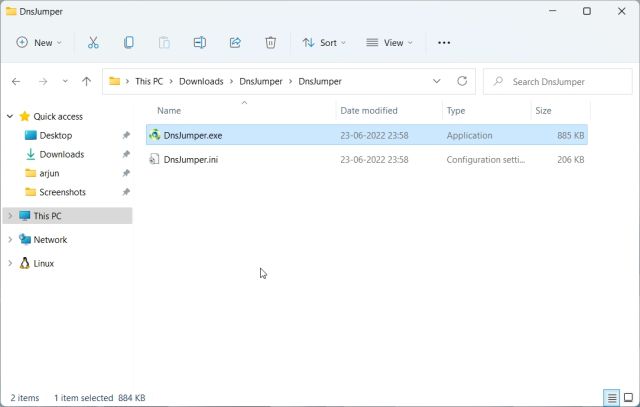
1. Head to this link and download the DNS Jumper ZIP file. Now, unzip the file in Windows 11 and navigate to the DnsJumper folder. Here, double-click on “DnsJumper.exe“.

2. Now, choose a DNS server from the drop-down menu and click on “Apply DNS“. That’s it, and you are set.

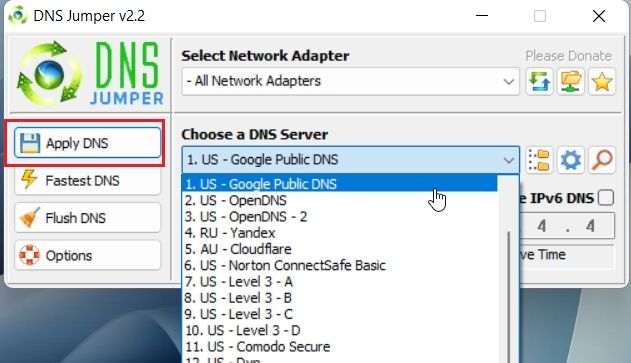
3. In case you want to set a custom DNS server, enable the checkbox and enter the primary and secondary server addresses in the fields below. After that, click on “Apply DNS”.

Frequently Asked Questions (FAQ)
What is DNS Server in Windows 11?
DNS Server lets your Windows 11 PC find the IP address of websites. It’s basically a phonebook where the IP address is located, and you are connected to the website.
Which is the best DNS server for Windows 11?
In my opinion, both Cloudflare and Google’s DNS servers are great for Windows 11.
Which DNS Server offers the lowest latency in Windows 11?
If you want fast performance from your DNS server in Windows 11, I will recommend Cloudflare.
Can we change DNS Server from the Control Panel in Windows 11?
Yes, you can still change the DNS server from the Control Panel in Windows 11. Follow our guide for more details.
Set Up a Custom DNS Server in Windows 11
So these are the five easy methods you can set up a custom DNS server in Windows 11. I will strongly recommend changing the DNS server from the Windows Settings page. Along with custom DNS, you can also enable DNS-over-HTTPS from there. Anyway, that is all from us. If you are facing internet issues and the Wi-Fi keeps disconnecting on your Windows 11 PC, follow our linked guide for an easy fix. Moreover, to resolve the “Network Discovery is Turned Off” error on Windows 11, we have a handy tutorial for you. Finally, if you have any questions, let us know in the comment section below.
[ad_2]
Source link


